№ 636 / Motion from the classroom
Show the difference between steps and results
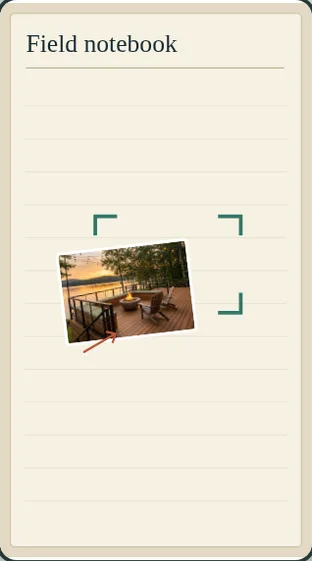
A pointer brushes the photo into alignment. The confirmation waits until the photo reaches the target corners.
IN EVERYDAY WORDS
Start at “Action visible”. A pointer brushes the photo into alignment. The confirmation waits until the photo reaches the target corners.
The look
A pointer brushes the photo into alignment. The confirmation waits until the photo reaches the target corners.
Say this to a designer
On my property story, use “Show the difference between steps and results”. A pointer brushes the photo into alignment. The confirmation waits until the photo reaches the target corners.
Direct the motion
These are starting points, not fixed rules. Match the timing to the content and the person using it.
- trigger
- Scrub “Show the difference between steps and results”, replay, or advance with native scrolling.
- entrance
- Establish “Action visible” so the viewer can recognize the starting state.
- path
- A pointer brushes the photo into alignment. The confirmation waits until the photo reaches the target corners.
- timing
- The complete replay takes 3.6 seconds. Keep each cue tied to its position in the sequence.
- easing
- Seek directly to the requested frame. Ease the movement between the authored poses.
- hold
- Settle on “Result visible” so the viewer can inspect the consequence.
- exit
- Carry the discovery source, original question and chosen references into the next scene.
The vocabulary
- Show the difference between steps and results
- A pointer brushes the photo into alignment. The confirmation waits until the photo reaches the target corners.
Make it fit your project
Good places to use it: property story, Motion from the classroom.
Use this when the viewer needs to follow the change from “Action visible” to “Result visible”.
Watch for: Keep the subject, orientation and interface legible throughout the change.
When motion is off: Choose “Action visible” or “Result visible” to inspect either still. Keep the full description available with motion off.
Implementation and accessibility
- Establish “Action visible” using an owned photograph or an illustrative interface.
- A pointer brushes the photo into alignment. The confirmation waits until the photo reaches the target corners.
- Return to “Result visible” using the end control and verify the result at phone size.
- Expose both named endpoints and a keyboard-operated control.
- Give spoken cues a readable visual equivalent.
- Load the active artwork on demand and share its frame calculation between scroll and replay.
Give it to your AI
Download the working source and example assets. Match this reference number in the included catalog to its renderer.
Replace [ELEMENT] with the part of your project you want to change. The prompt includes the design brief, motion direction, definitions, and implementation steps.
Read the full prompt
Use AI Acceleration Design Ref #636 (Show the difference between steps and results, version 1) on [ELEMENT] in my existing project.

Permanent reference: https://aiacceleration.ai/designrefs/636. This local brief contains the full definition. Inspect my existing stack, component, design tokens and interaction before editing.

Goal: A pointer brushes the photo into alignment. The confirmation waits until the photo reaches the target corners.

DESIGN REF #636 · Show the difference between steps and results

In everyday words: Start at “Action visible”. A pointer brushes the photo into alignment. The confirmation waits until the photo reaches the target corners.

The look: A pointer brushes the photo into alignment. The confirmation waits until the photo reaches the target corners.

Say this to a designer:
On my property story, use “Show the difference between steps and results”. A pointer brushes the photo into alignment. The confirmation waits until the photo reaches the target corners.

Motion direction (starting points to adapt):
Trigger: Scrub “Show the difference between steps and results”, replay, or advance with native scrolling.
Entrance: Establish “Action visible” so the viewer can recognize the starting state.
Path: A pointer brushes the photo into alignment. The confirmation waits until the photo reaches the target corners.
Timing: The complete replay takes 3.6 seconds. Keep each cue tied to its position in the sequence.
Easing: Seek directly to the requested frame. Ease the movement between the authored poses.
Hold: Settle on “Result visible” so the viewer can inspect the consequence.
Exit: Carry the discovery source, original question and chosen references into the next scene.

Design vocabulary:
Show the difference between steps and results: A pointer brushes the photo into alignment. The confirmation waits until the photo reaches the target corners.

Reduced motion: Choose “Action visible” or “Result visible” to inspect either still. Keep the full description available with motion off.

Implement:
1. Establish “Action visible” using an owned photograph or an illustrative interface.
2. A pointer brushes the photo into alignment. The confirmation waits until the photo reaches the target corners.
3. Return to “Result visible” using the end control and verify the result at phone size.

Adapt the reference to my branding and content. Preserve existing functionality and semantic HTML.
Reduced motion: Choose “Action visible” or “Result visible” to inspect either still. Keep the full description available with motion off.
Accessibility: Expose both named endpoints and a keyboard-operated control. Give spoken cues a readable visual equivalent.
Performance: Load the active artwork on demand and share its frame calculation between scroll and replay.
Avoid: Keep the subject, orientation and interface legible throughout the change.

Show me the working result, verify keyboard, mobile, loading/error and reduced-motion behavior, and explain any tradeoff. Do not publish or change unrelated elements.
Permanent reference #636 · version 1. Pairs with #007, #003.